|
Table of Contents
|
Installing
Computer Memory
Memory installation is a pretty easy upgrade to perform. Most
of the work, if you could call it that, comes before you actually
do the upgrade - in being sure you get the right kind of memory
for your system.
SIMMs (EDO)
First some info, though. Your computer, if it uses 30-pin
or 72-pin SIMMs, organizes its SIMM sockets into groups called
banks. Some boards say that two sockets make a bank.
Some say that one is a bank. Nevertheless, a bank must be
full. A half full bank will drive your computer nuts. Also,
you can't mix two different kinds of memory in a single bank.
For example, you can't put a 4MB SIMM and an 8MB SIMM in one
bank and expect to get 12 MB of RAM. Also, many systems require
you to put the memory in in pairs. Therefore, if you want
32 megs of RAM, you have to stick 2 16's in instead of one
32.
|
|
Here's a shortcut which is almost always true. An older computer
with a 386 or an early 486 chip usually has a 4 socket bank
of 30-pin SIMM modules. A later model 486 requires only one
socket of 72-pin modules. Pentium machines have two socket
banks of 72 pin modules, meaning you must install RAM in pairs.
In all of these systems, the bank must be full for your system
to operate. Following these guidelines, lets say you want
to add 16 meg of RAM to your Pentium machine. You could buy
one 16MB SIMM, but this won't work because you will have a
partially filled bank. You must buy two 8MB SIMMS instead,
and install them in a pair.
-
Turn off the computer, unplug it, and take off the case
cover.
-
-
Remove the old memory (if applicable). This will entail
loosening the little retainer springs on each end of the
memory socket until the memory stick can be removed.
-
Install the RAM. To do this, first locate the little notch
on the pin-side of the module. This notch will line up
with a notch on the memory socket itself, to ensure proper
alignment. Position the module over the slot at a 45-degree
angle with the module pins in the slot. Gently rotate
the SIMM until it is in an upright position. When it is
in an upright position, the retainer springs will snap
into place and secure the SIMM.
-
Repeat previous step for all remaining SIMMs you wish
to install.
-
Test it. Before you put your case back on, power on your
system and make sure it correctly tallies the RAM.
-
DIMMs (SDRAM, DDR-DRAM)
Now, we can all thank God that SDRAM and DDR came out, or
we'd all have to decipher all that bank stuff in order to
upgrade memory. DIMMs are much simpler. Most motherboards
have the 168-pin slots for SDRAM or 184-pin slots for DDR-DRAM.
Each DIMM slot is a bank, so one can install these types of
memory in any combination they want. It is best, if you have
several open DIMM slots, to use the lowest number slots first.
The slots are numbered, such as DIMM 0, DIMM 1, and DIMM 2.
Choose the lesser, unused number. If this is the only module
in the system, use DIMM 0. Some older motherboards have both
SIMM and DIMM slots. On these, each DIMM slot is a bank, just
like normal. The SIMM slots right next to them are usually
paired in a bank, just like the normal Pentium bank setup.
-
Turn off the computer, unplug it, and take off the case
cover.
-
-
Remove the old memory (if applicable). This will entail
pressing down on the little ejector clips on each end
of the memory socket until the memory stick pops out of
the socket. Then you just life it out.
-
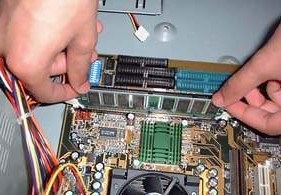
Install the RAM. To do this, first locate the little notches
on the pin-side of the module. These notches (usually
two) will line up with keys on the memory socket itself,
to ensure proper alignment. With the ejector clips in
the open position, position the module over the slot and
begin pressing the module down into the slot. You will
need to press down pretty hard. As you press down, the
module will sink into place and the ejector clips will
close themselves to lock the module into place.
-
Repeat previous step for all remaining DIMMs you wish
to install.
6. Test it. Before you put your case back on, power on
your system and make sure it correctly tallies the RAM.
-
|
 |
Do
It Yourself:: Installing Laptop Memory
|
|
